 Ask Us
Removing WiFi networks from Chromebooks
Overview
Note: You only need to do this if you have added a new wireless network
When you add a custom (home) WiFi connection to a chromebook it does not automatically delete itself until you manually remove it.
Steps to removing a custom WiFi account
- Log in with the default account
- At the bottom right corner, click on the WiFi icon

- Under the new window (just above the WiFI icon), select Settings

- In the settings window under the Network Settings window, click WiFi U of T.

- You'll see a list of all nearby networks. To list all the remembered ones click Known networks,
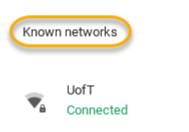
- . The list of remembered networks will pop up. Click on the triangle next to the network you have added and click Forget.
Last updated: July 11, 2017